
Lasagna Gardening: A Backyard Guide for Beginners
Looking to cook up your own lasagna garden? Okay, maybe there’s no cooking involved (at least not until harvest time), but lasagna gardening has become an increasingly popular no-till, or no digging, gardening technique that uses layers of compostable materials, including kitchen scraps, cardboard, coffee grounds, as well as numerous other materials to grow vegetables.
Furthermore, lasagna gardening is sustainable, produces fewer weeds, and you probably already own most of the materials required. If you’re interested in trying lasagna gardening in your own backyard, here’s everything you should know about this great choice for growing cucumbers, eggplant, squash, carrots, garlic, tomatoes, and more.
What are the Layers in Lasagna Gardening?
Lasagna gardening is a great technique since it does not require you to dig up the earth to plant seeds. All you have to do is make an outline of your plot and begin preparing your layers.
Think of it like making a compost heap. If you give the layers time to bake into the ground, the soil will become nutrient-rich, and then you can start gardening. When beginning to organize your layers, the goal should be to add in as much carbon and nitrogen into the soil as you can.
So what goes into nitrogen and carbon layers?
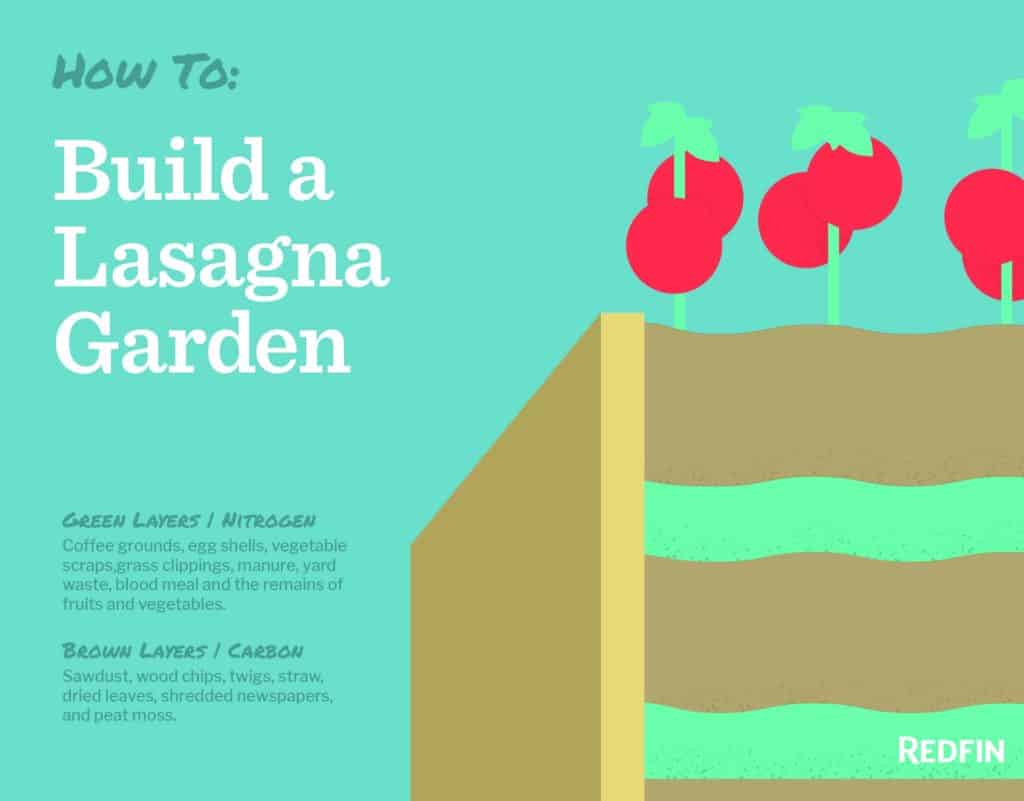
Nitrogen Layers – Green Materials
Green materials are meant to incorporate nitrogen into your garden and can include items like coffee grounds, eggshells, vegetable scraps, grass clippings, manure, yard waste, and remnants of fruits and vegetables.
Carbon Layers – Brown Materials
There are plenty of brown materials you may use for your garden, such as sawdust, wood chips, twigs, straw, dried leaves, shredded newspapers, and peat moss. These materials are rich in carbon and you can simply use anything that’s readily available to you.
When is the Right Time to Put Together a Lasagna Garden?
You can assemble your lasagna garden at any time of the year. If you do it in autumn, you can easily find fallen leaves and grass clippings. If you want to plant your garden in summer, consider assembling your lasagna garden in spring. It takes a few months for your layers to break down and become nutrient-rich soil for planting, so plan ahead.
If you start your lasagna garden in summer or spring, you may need to add some soil-like components to your layers, such as peat moss or topsoil, to help your plants develop strong roots early. If you make it in spring, use as many greens and browns as you can to allow your soil to become as nutrient-rich as possible. The bed will settle as the layers decompose.
How to put together your own lasagna garden
The key is to try and have a carbon to nitrogen ratio of two to one when putting your layers together or simply use two inches of carbon-rich material to every one inch of nitrogen-rich material. Once you have all the ingredients and identified a space in your backyard, you can put it all together with the following steps:
- Set down at least six sheets of newspaper over the area you want to use for your backyard garden. Try using parts of newspapers that do not have a lot of colorful ink. If you do not want to use newspapers, you may also use corrugated cardboard. The purpose of a newspaper or cardboard base is to smother all turfs and weeds on that spot, resulting in fewer weeds to have to deal with in your garden.
- Soak your cardboard or newspaper in water to keep light from getting in. The presence of water will also help to hold the base of your garden in place in case it’s windy.
- Add a layer of nitrogen material (vegetable scraps, eggshells, etc) at a thickness of two to three inches. If you choose to use manure, make sure the manure is only from animals that eat plants. Do not use droppings from your cat or dog as they could carry worms and do more harm than good to your garden.
- Add four to six inches of materials rich in carbon, such as straw, sawdust, or twigs. If you are using twigs or wood, consider using very small pieces so your lasagna garden will bake fast.
- Apply another layer of nitrogen-rich ingredients followed by another layer of carbon ingredients. Do not worry if your layers start to appear too tall, they will shrink when your materials begin to break down and nutrients will begin to absorb into the soil.
- Cover your lasagna bed with a greenhouse plastic film for the first few days. The plastic covering can be purchased at most gardening stores and will protect the top layer from the wind while adding heat to facilitate the process of decomposition.
- Let your lasagna bed sit for a few months so the materials can break down. Your soil will absorb all the nutrients it needs for the growth of your plants and should be loose, fluffy, and crumbles in your hand when ready.
- When your soil is ready to plant, just start as you would with any other garden. Though if you used cardboard for your base layer, you may have to cut through it to plant your seeds or starter plants directly into the earth. Though this shouldn’t be difficult as all the materials have broken down into a nice lush soil.
How to Maintain Your Lasagna Garden Over the Years
You can easily maintain your lasagna garden year after year. Your garden bed isn’t permanent so you need to keep adding new layers over the years to keep your soil nutrient-rich each year. You may add small sticks and twigs, grass, clippings, and compost. If you add sawdust, keep it to a minimal amount.
Add earthworms regularly as they will help you mix up the materials. You can either dig them up from your compost or buy them from a local garden or feed store. Shred your ingredients as finely as possible so they can break down faster and transform into that awesome nutrient-rich soil you’re looking for. Just think, the finer the materials, the better the soil. Water your lasagna garden regularly to keep the soil from drying up and cover crops with the greenhouse plastic film to help prevent erosion.
Why Choose Lasagna Gardening Over Other Gardening Methods
Lasagna gardening offers plenty of advantages over other more traditional methods of gardening, such as:
No Need for Digging or Tiling: If you enjoy gardening but do not care for manual labor such as digging and tiling, this is the right gardening technique for you. Also, because lasagna gardening does not require tiling, it’s better at preserving important microorganisms for your garden.
Fewer Weeds: Lasagna gardening is a great gardening technique for limiting the number of weeds or unwanted plants you’ll have to deal with.
Flexibility: Anyone can practice this technique of gardening because it does not require a lot of space and you can start at almost any time of the year, depending on where you live. The climate in Pheonix, AZ, for example, is vastly different than Boston, MA so too are their respective growing seasons. You only need to identify a small space in your backyard and start creating your garden.
Use of Organic Material: The use of organic materials in lasagna gardening infuses nutrients into the soil, making for a rich environment for plants to grow. Also, you do not need to use a lot of fertilizer as your plants will be thriving almost entirely on compost.
Accessibility: You can tailor the height of your lasagna heap to suit your needs. It can be as tall or short as you wish.
Less Watering: You do not need to water a lasagna garden as frequently since the materials used don’t lose their moisture easily.
Expert Tips for a Great Lasagna Garden
- Avoid using treated wood.
- When using newspapers for your base, avoid using colored ads.
- If you use cardboard, remove all staples, glue, and tape.
- The easiest time to start your garden is during fall when you have access to plenty of organic material.
- The amount of green material should be half as much as the amount of brown material you use.
- Straw is better than hay when making your lasagna garden. Hay takes a long time to break down into nitrogen, whereas straw breaks down easily.
The post Lasagna Gardening: A Backyard Guide for Beginners appeared first on Redfin Real-Time.
